What is a sink drain?
Sink drains are small, inconspicuous but essential parts located at the bottom of your basin, but they play a vital role in your bathroom's plumbing system, helping ensure water drains efficiently while preventing debris and obstructions from entering your pipes.
With a well-chosen and correctly installed sink drain, you can not only ensure efficient drainage, but also add a touch of style and sophistication to your sink.
Choosing and replacing a sink drain? It is not always obvious!
Replacing a sink drain may seem like a simple task, but for many homeowners, it can quickly become a complex and headache-inducing project. From technical challenges to aesthetic choices, there are several aspects to consider when considering changing your sink drain.
Some of the main challenges people may face include:
- Compatibility, is the drain compatible with my sink?
- Technical skills, how to install or replace my drain?
- The choice of materials and types, what materials and type of drain should I take?
- Existing plumbing issues, it is possible that replacing the sink drain may uncover underlying plumbing issues, such as leaks or clogs, that need to be addressed at the same time.
- Maintenance and durability, once the new drain is installed, how to take care of it and ensure its long-term durability to avoid future problems?
In this article, we will give you practical tips and recommendations to help you successfully complete the process of replacing your sink drain, while avoiding common pitfalls and ensuring satisfactory results.
The different types of sink drain:
Sink drains are essential parts of any bathroom installation, but it is important to understand that there are different types of drains, each with their own characteristics and benefits. Here is an overview of the main types of sink drains:

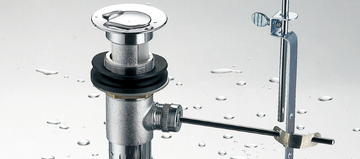
Pop-up drains: are among the most common and popular. They are equipped with a lifting mechanism that allows the drain to be easily opened and closed with the push of a button or pull of a rod. These drains are often appreciated for their ease of use and their refined aesthetic.

Click-clack drains: most requested by individuals for their practical features and ease of installation. They are equipped with a trigger mechanism which allows the drain to be opened and closed by simply pressing the click-clack device located in the center of the drain. These drains provide a practical and stylish solution for controlling the flow of water in the sink.


Plug drains: More traditional drains with the simplest mechanism, using a rubber or silicone plug to close the sink drain hole. Although they are simple and easy to use, they may be less aesthetic than other, more modern options.

Free-flow drains: designed to allow rapid and efficient drainage of water without any closing mechanism. They are ideal for sinks where the risk of overflow is low and rapid drainage of water is preferred such as public places.
By understanding the different types of sink drains available, you can choose the one that best suits your personal preferences, functional needs, and bathroom design.
Make sure the drain material is compatible with the cleaning products you typically use in your bathroom to avoid damage or discoloration.
Drain size:
- Accurately measure the diameter of your sink's drain hole. Standard sizes are usually 1 1/4 inch (32 mm) or 1 1/2 inch (38 mm), but it is important to check the exact size to ensure a perfect fit.
- Make sure the drain you choose matches the size of your sink's drain hole. A drain that is too small risks letting debris through, while a drain that is too large will not fit properly and could cause leaks.
Drain material:
Sink drains are available in a variety of materials, including stainless steel, brass, plastic and chrome. Each material has its own advantages and disadvantages:
- Stainless Steel: Corrosion resistant and durable, stainless steel is a popular choice for sink drains. It also offers a modern and elegant aesthetic.
- Brass: a robust and aesthetic material, often used in humid environments such as bathrooms. It provides excellent durability and corrosion resistance.
- Plastic: Plastic sink drains are inexpensive and easy to install, but they may be less durable than metal options. They are often used in low-end or temporary sinks.
- Chrome: Chrome is often used as a finish for metal sink drains, providing a shiny and elegant aesthetic. It is durable and corrosion resistant.
If you're looking for an eco-friendly option, you can also opt for sink drains made from recycled or sustainable materials.
By following these tips, you will be able to select the right size and material for your sink drain, ensuring a perfect fit and long life for your installation.
How to install a sink drain?
There are usually instructions included in the product, otherwise, simply see the steps below to install your drain.
Step 1: Preparation
- Gather all the necessary tools, such as an adjustable wrench, screwdriver, plumber's putty, etc.
- Make sure you have adequate protection to prevent water damage, such as a bucket and rags.
Step 2: Removing the Old Bung
1. Start by turning off the water supply and placing a bucket under the sink to collect any residual water.
2. Use an adjustable wrench to unscrew the sink trap and remove it.
3. Unscrew the pull tab if present.
4. Unscrew the existing sink drain using a screwdriver if necessary.
5. Thoroughly clean the area around the drain hole to remove any residue or debris.
Step 3: Installing the New Drain
a. Installing a pull-down/pop-up drain
1. Place the foam gasket against the drain hole on the upper part of the sink and place the upper part of the drain on top and the same with the lower part of the drain, under the sink, taking care to position the joint correctly.
2. Then screw the lower part to the upper part. (Attention, the pull must be on the side of the wall, well in line!)
3. Position the waste pull-tab and connect it or place the rod in the hole provided for this purpose and screw in the ring.
4. Then slide the connecting piece onto the axis and install your pull by passing it at the level of the faucet.
5. Tighten the screw of the connecting piece
6. Check that the drain cover closes and opens correctly when you activate the mechanism.
b. Installation of a click-clack/free-flow/rotary valve/plug drain.
1. Place the upper part of the drain and its gasket in the drain hole, passing through the inside of the basin.
2. Then place the lower part under the sink then screw the 2 pieces together by hand.
4. Screw in the crown.
6. Exert pressure on it to check that it locks and rises as desired.
Step 4: Reassembly of the trap
1. Replace the sink trap by screwing it firmly onto the drain.
2. Make sure all connections are tight to prevent leaks.
3. Check that the siphon is correctly positioned and adjust if necessary for perfect alignment.
Step 5: Final Test and Check for Leaks
1. Turn on the water supply and let some water run into the sink.
2. Check carefully for leaks around the drain or siphon.
3. If you notice leaks, tighten the connections or apply more plumber's putty as needed.
Your drain is normally well installed, otherwise, it is imperative to contact a plumber.


